Tuesday 28 June 2016

How To Add "Read More" Blogger Post


First of all, you are welcome to Build A Perfect Blog. Here we make all the impossible possible for Bloggers both Newbies and Professionals.


This is very important for all bloggers. As a newbie you have to make your blog look more professional to attract your readers and to make it possible for them to navigate through different topics on your blog through the help of adding the 'Read More' link. Thanks to Blogger for making it very easy for us to add the 'Read More' link to our blog post. Blogger has made it possible for us with no HTML editing, no HTML code adding. So, don't be afraid even if you have little or no knowledge about HTML you can still do this.

In this article will guild you through, in a very short and simple steps on how to add the “Read More” link to to your Blogger blog post.

Here is the deal! Ok let's head there!

Step 1. >> Login to your Blogger Blog

Step 2. >> Head to your Blogger Dashboard

Step 3. >> Click on the orange colour 'New Post' button at the top left corner of your Blogger dashboard. It will take you to a new page where you can write your new blog post. Then write your post, after writing your post, on the body of the post where you wish to add the 'Read More' link, place your cusor there and click on the post. Now head to the final step.

Step 4. >> Click at the 'Jump Break' icon at the top level. See picture below...


Note: This is manual adding of the 'Read More' link, which will be done manually each time you are writing a blog post.

On my next post I shall show you how to add Auto 'Read More' link to your Blogger Blog post.

I believe this article was helpful to you. If you have any problem with adding the 'Read More' link, please don't hesitate to drop your comment on the comment box, I will get back to you as soon as possible. Don't forget to share and like our social media pages. Looking forward to read your comment.Thank you.
Share:

How To Build High Quality Backlinks

  Welcome to Build A Perfect Blog. In this article am going to take you on how to build quality backlinks. This is the most important thing that many Bloggers don't really do, but it is very important. Because getting high quality backlinks, create more web traffic and is one of the most popular method to boost your content on the  competition of Blogsphere. However, getting the method to good high quality backlinks might take a little bit of your time. But believe me it is the right thing to do.

  Firstly, you need to start by understanding what Backlinks is and it benefit to your content. Then you can start extend your efforts to build even more Backlinks using a creative and an effective way that will maximize the potential of your content.

  What is Backlink ?

  Backlink is an incoming Hyperlink that connects the web page or content to another website. You know, Backlinks are very important when it comes to page ranking, because Google rates them highly. Meanwhile, the Backlinks themselves must be of good quality in order to generate the ranking needed to boost your content ranking aheead of the competition 

  Having quality Backlinks is very important because, having 20 good Backlinks is better than having 100 bad once, because the 20 quality Backlinks will beat  the 100 bad once in terms of Google ranking. This is why you must start to strive for quality Backlinks every time. Although, it might take you time to build backlinks to your contents, because people will like to see it and decide to link to it, in order to add more value to there site or blog.

  If you have decided to start building quality Backlinks, then you have made the right decision. It is just for you to wait to see the good result of your hard work.

Write A Long And Interesting Article 

Now you need to know that one of the way of building quality Backlinks is; is creating long and interesting post, that uses chart, images  and other graphics to really make it interesting. Your article will have to be at lease 1000 to maybe 1300 or 2000 words long and make sure you are giving your reader the real and good information that they need.

Create Special Days

  Another good way of getting good quality Backlinks is observing  special days like; Valentine's Day, Easter's, Christmas and the rest of it, to offer discount to on your products or services

  Note that, you will need to do some analysis to know the kind of holidays your audience like to know the type of content that best match there interest. But I think Valentine days are wildly observe and everyone love to share. So, I prefer you should write good content and raise your campaign on valentine days, which is bound to get high traffic and quality Backlinks.

Guest Blogging

  Do you want to make a good impression? if yes. Then Guest Blogging is one of the best way to get quality Backlinks. Just look for a good place to write guest blog, believe me your post is going to go viral if you do this and not only go viral, but it will also help someone else out and in return you will get huge traffic and quality Backlinks as well.

  Understand that it will consume you time writing interesting content. But if you can pull through it, the you stint as a Guest Blogger will pay off big time for your efforts. One important thing you should consider as Guest Blogger is to write a related and interesting post that will attract readers attention and also provides room for you to write another post for the Blogger.

  Guest Blogging can be more rewarding in many ways than one. So, if you have the time to do thing right, the you should market your services as Guest Blogging.

Interact With Other Blogs 

  When you visit other Blogs or see other videos you like and it is within your Niche don't just read or view and say "Nice Job" and leave it at that. Make sure you write good and interesting comment or reviews so that you can really extend your thoughts. Don't fail to be  positive, articulate and get straight to the point. Make it very friendly and understandable to create more audience and also drop a link related to that topic to create a unique Backlinks. 

Offer Free Products And Services

You know this days everyone wants it free. So offering free product might be a little bit expensive but believe me it will boost your audience level. You can offer free e-Books or Promotional gift if you want to. Then, by doing this your services might be needed more than often.


Share:

Saturday 25 June 2016

How To Add A Recent Post Feed To Blogger Blog

Adding the recent post feed to your blog is very is important because it will help your visitors  know exactly where to navigate to. And it will help them know what exactly is trending at that moment they visit.

In this piece am going to take you on how to add a "Recent Post" feed Gadget to your Blogger blog. You don't need to be a webmaster to do this, all you need is for you to follow this few steps an going to show you to accomplish this.

Lets start:

Step 1:  Log in to your Blogger dashboard

Step 2: Click on Layout, it will take you to where you can add new side Gadget to your blog.

Step 3: Click on Add a Gadget at the side bar

Step 4: Select Feed or click on the blue plus botton 

Step 5: A popup dialog box will appear requesting you to configure the URL of your feed. Enter the         following text into the box:

http://yoursitename.blogspot.com/feeds/posts/default


N/B: Change yoursitename to your own blog or site url name.

 
Step 6: Once you have entered your site name correctly, then Blogger will retrieve your Feed and display a preview in a dialog box. The feed will include the links to the last five post you recently added to your blog.

Step 6: Automatically it will add your blog name as the Title of the widget or gadget. So you have to replace the Title to maybe, "Recent Post" or any thing similar to that.

Step 7: Click on the Save button.

Now that you have save it, click on the View blog button at the top left corner of your blog to see your recent post in action.

You may want to change where it appears on your side bar. All you need to do is to go back to you blogger dashboard and head to Layout>>Page Elements and use the drag and drop feature to position the gadget.

Thank you for visiting this blog. I believe this article was helpful to you, I would like to read your comment on the comment section. Don't fail to ask questions if you have any and I will get back to you as soon as I can. you can also like & share this article to your friends.

NOTICE: Subscribe to our news letter to get updates from  this blog.
Share:

Wednesday 22 June 2016

How To Create A Blog

Getting Started 


If you have never used blogger before, then this platform will get you up and running in just few minutes.

Create Your Blog

 In few steps am going to show you how to create your own blog. You don't need to be a webmaster to do this, all you need is your Laptop with a Data subscription for browsing, then you are  set. 
Lets begin the show:

Step 1:
sign in with your Google Account(i.e Your Gmail Account). if you don't have a Google Account yet, you can create one here before we proceed.

Step 2:
 Go to Blogger Homepage and enter your Google user name and Password to Sign in. Now that you are done with signing in type a display name(make sure you used You name, because this is how you are going to appear as the site Author), then click to accept Blogger's Terms of Services.

Step 3:
Finally, click on the "create a Blog" button to create your Blog. On the next page, you will ask of Tittle(eg. Build A Perfect Blog) and the URL(eg. buildaperfectblog.blogspot.com) for you blog.  

Congratulations! You have just succeeded in creating your Blog.
See Snapshot Below:

N/B: Make sure your Blog tittle is relevant to the content of your site or Blog, perhaps including a keywords connected to your content. By doing this, it will people to find your blog more easily in search engines. It is also very useful if you match your the URL to the Tittle of your  site or blog. Example: URL= www.buildaperfectblog.blogspot.com and Blog Tittle=Build A Perfect Blog.

Choosing Your Blogger Template 

Now that you are done with creating your blog, you have to choose a "Starter Template" for your Blog. You can easily change it or customize it later, for now just choose the style you like. 

Click on "Create Blog" button and your Blog will be ready to be use. You can publishing your post or begin to navigate through your Blogger Dashbord.

Get complete eBook on how to create and monitize a free blog here

Share:

How To Get Jumia Affiliate Links To Share On Social Media

You can get links of Jumia ads from the jumia affiliate marketing dashboard that you can share on your Twitter, Facebook, Google+ and others without having to go through the stress of using the deeplink generator.


 If you share such link on your Blog, facebook, Twitter, Google+ and others, if you are lucky someone buy anything through your link from Jumia. Jumia will pay you some percentage as commission from what your referee bought from them.

You Might Be Wondering How To Get Started. It is very simple just follow the instruction below;

Get Started: 

===> Click Here to Register with Jumia if don't have account with them. Fill in the Registration form with your approved email address and a unique password. I you already have an account proceed to the next step.
===> After registration, go to the Dashboard. On the dashboard Click on Programs tab
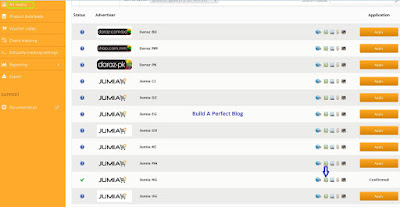
===>   Navigate to where you see Jumia NG. Click on  the  admedia icon as seen below:
 
After you have click on the admedia, it will take you to another page, where you will see different categories of products on Jumia Platform.
===> Click on the product you are willing  to promote. eg. Gadgets, Home Appliances, Cloths, Shoes, Wrist Watches and lots more.  The available jumia banners for the selected category will be displayed.
===> Click on the link that will be given to you as indicated below. Please, don't click on the image.
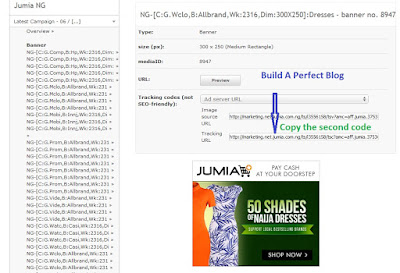
A new window will open. copy the Click URL as it is been highlighted in the screenshot below:

===> Now that you have copied the link given to you. Go to your Facebook Page or Timeline and paste it as a new status or on you Twitter as a new tweet. 
Make sure you give a little description of the product you are promoting to convince you audience to click on your link to buy. Image will not appear, only the link will. So, what you need to do is to Save the image of the product on the Jumia Page. Then, upload it on your Facebook and Twitter as image and add the link that you copy to it and post.
Now that you have done this, keep an eye on your progress on Jumia Dashboard. Make sure you keep doing this for the best result.
 Note: In case the link is too long and you want to make it short. You can make use of goo.gl  before sharing it on your social media and also your blog post
Thank you for your time. I believe this post was helpful to you, so feel free to drop your comment, because we do love your comment. Don't also forget to like our social media pages and our Youtube Channel. Thank you.
Share: